Introducing Procreate tools - beginning with digital color palettes for you!
/New tools for Procreate! Digital color palettes!
Read MoreNew tools for Procreate! Digital color palettes!
Read MoreWelcome everyone! I’m starting out today with the first part of a wee little watercolor tutorial. I created a succulent wreath with watercolors, and this video shows the very first steps on how to paint one. It’s super simple and you can do it, too!

The video is a little long, as I’m just starting to figure out how to even do these, haha so BEAR with me!
I am going to be posting the second video shortly so that you can see how to complete the design.
The tools I used:
Watercolor Paint – I use a Winsor & Newton Palette of half pans of paint, here is a good beginner set
Round Watercolor brushes (large and small), I like Princeton Artist Brand or Davinci Series, sizes 8, 5 and 0 for the tiniest details
For economy watercolor paper I always use Canson XL series paper. Because I’m going to scan and use this watercolor digitally, the quality of the paper isn’t super important. If you’re creating something you want to preserve and hang the original of, I recommend Arches paper, which is pricier but archival in nature.
Water jar and paper towel for dabbing :)
So, again - sorry for the rambling and often times slow tutorial - I'm working on bettering this and I hope a year from now I will be epically embarrassed by the quality of this video!
Stay tuned for more tips on watercolor painting and designing and maybe some insight on using my designs to decorate your home or baby's nursery. Find some of my prints for sale using this watercolor succulent design and more in my Etsy shop!
Wanna share your attempts to create your own watercolor succulent wreath with me? Tag me on instagram @the_watercolor_baby or @mariabpaints
If you liked this content and want to see more, plus get coupons and sneak peeks sent to your inbox, subscribe to my newsletter below! See you next time <3
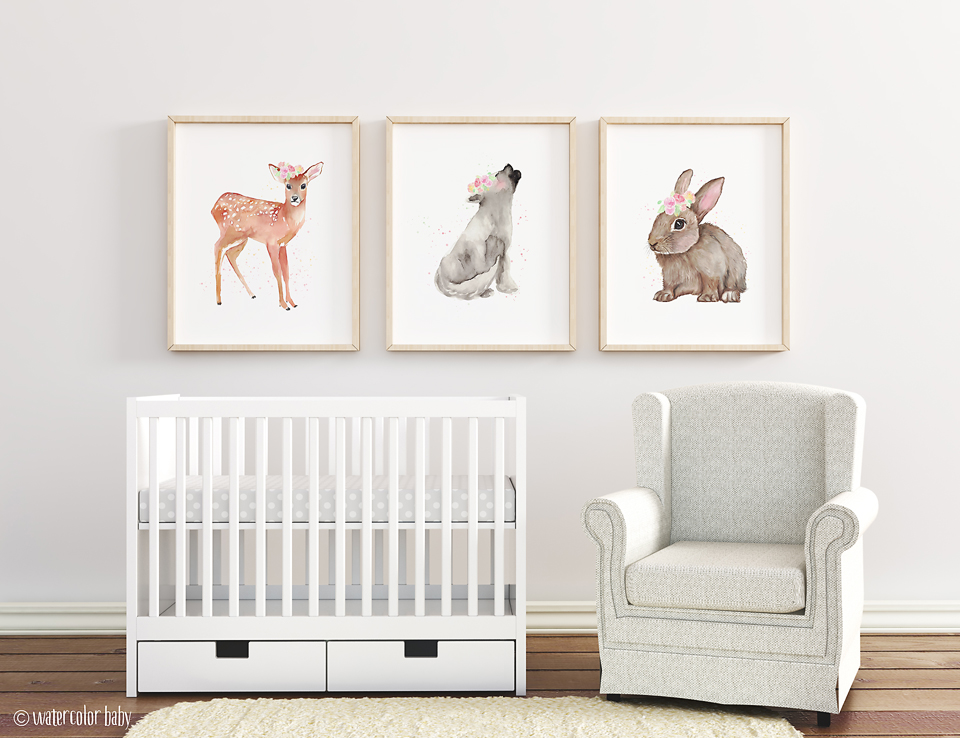
My latest artwork features some woodland animals and their delicate pink rose crowns. I really love the way the pinks and yellows go with the soft natural tones of the animals I've chosen for these watercolor digital prints. Observe:

Don’t they look sweet together? I really love how the rabbit and deer are looking out and the wolf is doing it’s thing, howling at the moon. I’ve used soft earth tones for each animal with a plain, white background. There are watercolor specks splattered in pinks, greens and yellows to tie in the colors from the floral crowns.
I’ve put together a Pinterest Board that features some other items that might go well in a nursery themed with forest creatures and soft pink florals. Here’s a quick peek of some of the other items I have on there:

I love the idea of the light pinks and greens and grays, paired with some subtle forest features like the deer antler lamp and stuffed animals. Pressed wild flowers also add a touch of the outdoors to a muted pink or beige wall. If you want to go all out a floral wall paper accent wall is a great touch as well!
You can purchase my woodland animal nursery prints as a set or individually in my Etsy print shop. Another great idea is a monogram of baby’s first initial with the same rose motif and I’m adding those to my shop, too. I will be adding different styles of initial monograms over the coming weeks, but for now the rose motif is the star – look:

If you’re looking for a specific piece of art to print out for your baby’s wall or to add to your home decor, message me and I’ll see what I can do! See you next time
Hi everybody! I haven't been here in a while and that's totally my fault. But I have some great news! I just opened up a brand new Etsy shop called "The Watercolor Baby" and it's going to be CHOCK full of printable art!
So here is a little preview of one of my most recent digital prints:
As you can see this cute little fox is ready to adorn a brand new baby's nursery or a child's playroom or bedroom.

I know the fox themed nursery is still pretty huge right now. In fact, the woodland animal decor in general still is. I am going to be putting together some Pinterest boards to help showcase just how wonderfully my digital prints will go in these awesome bedroom designs!
Here's an example of one for a fox or woodland themed nursery for starters:

I like the idea of pairing the little fox print with some neutral, but non-traditional colored furniture like this teal dresser and a gray crib, while incorporating fun bright spots like this felt rainbow garland. The colors in the garland accent the bright balloons from the watercolor print, which I think looks great!
I think the woodland theme will be sticking around a bit longer, so I'm planning to work on some more animal inspired artwork, and I will be updating my blog as I go. In the meantime, if you wanna check out my new etsy store - find all my work here!
What would you like to see in my shop? Comment below if you have ideas!
Until next time! I'm off to paint.
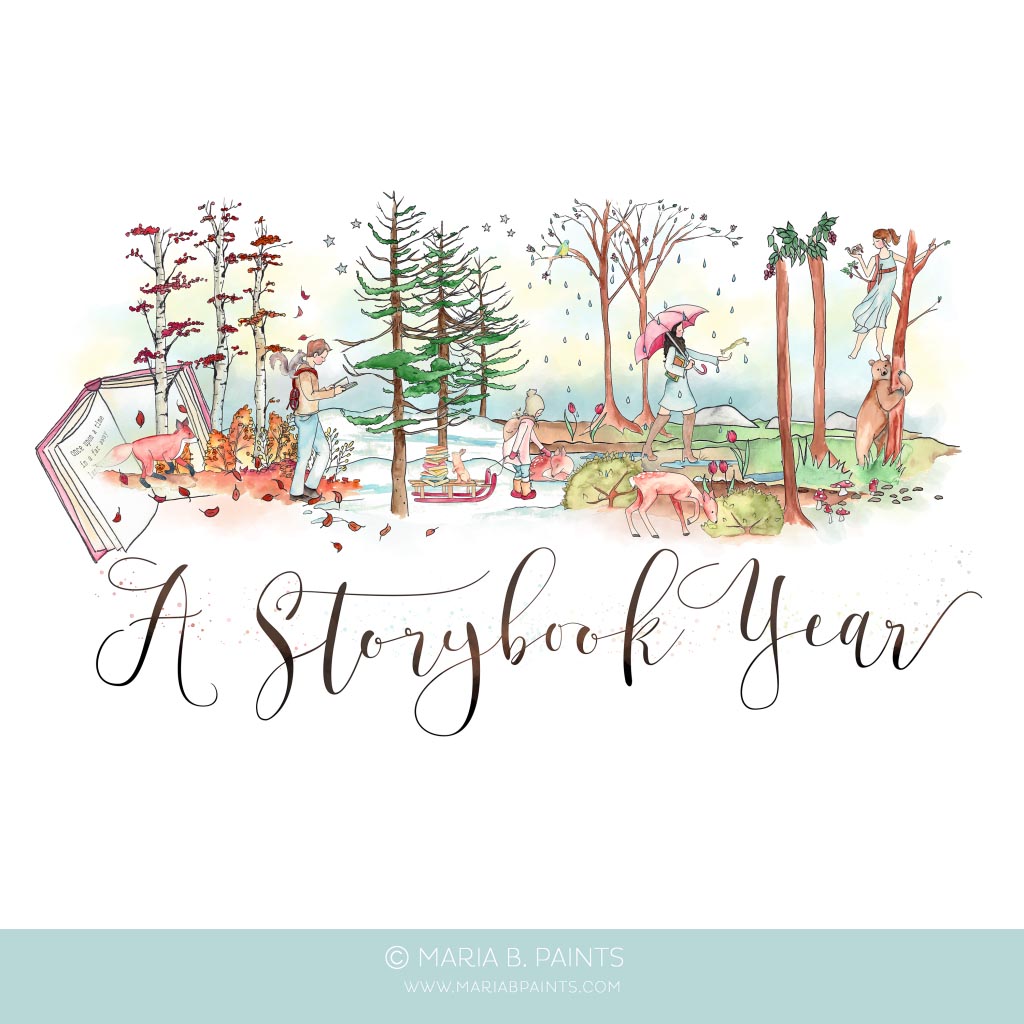
So I have finally been able to capture a logo design from start to (almost) finished, and I wanted to share it all with you! This logo from "A Storybook Year" (an awesome family driven blog dedicated to reading a book a day for a year, check it out!) is full of whimsy and fun.
Here are some quick snaps of my drawings before they were painted in:
And the final outcome! Watch the video below to see me put it together in Photoshop.

The logo represents the family behind the blog, both parents and their two daughters. They wanted the logo to depict a walk through the woods, along with all the forest creatures that might live there. I decided to use a "four seasons" theme, to represent the year and allow each character their own individual scene.
Each item in this logo was illustrated separately, to make putting it together easy to manipulate and change. The process stars with a lot of research and studying (on my part and the client's) to get an accurate representation of all the aspects of the design. I use real photographs of animals and nature to create the illustrations used in my designs. I had so much fun creating all the little animals!
After I draw the elements, I then paint them. This style is a little different than I usually do, because it incorporates an outline for each illustration - which I feel looks more "storybook" and reminiscent of picture books.
Using watercolors, I try to create a feeling of depth and whimsy. After each drawing is completed, painted and dry - I scan everything at a high resolution and then cut each piece out in photoshop. Then I put it all together!
Without further ado, check out how I got from beginning to end with this logo design. Enjoy!
Interested in a custom watercolor logo of your own? Contact me here
Come back soon!
I'm so excited to open up a new clip art only shop on Etsy! I love painting for fun, and now I get to share all my designs with the world.
I will be hosting a giveaway on my new Facebook page in the new year and the winner will get a BIG prize, so stick around for that. In the meantime, please enjoy some freebies! I designed a set of pastel feathered arrows (find them to purchase here) - and created these free printable gift tags just for you! These would be perfect for an upcoming Valentine's day gift, don't you think?

(To get your free gift tags, click on the image to open it in a new tab, download or print from your screen)
Enjoy and spread the word! Keep your eyes peeled for the contest and other fun items, including painting tutorials coming up soon. Follow me on FB and Instagram (@mariabpaints) to be up to date with all the latest.
Thanks for coming, see you soon!
Interested in something custom? Contact me for a quote!
Hi friends! This is not a watercolor related post in the least, but I thought it’d be fun to share. I’m always seeing blog posts about ideas for Elf on the Shelf and I wanted to add my own. Most of these ideas require a pose-able elf, so if you haven’t modified yours yet, some thick bendy wire is great for sticking in each arm and leg – it really opens up the possibilities! Hopefully it will help spark some ideas for those of you partaking in this elfish tradition. Here we go…
1. Have your elf sitting by the Christmas tree, enjoying some hot chocolate with friends. Use things around the house (other toys – here he is wearing a Barbie jacket and sitting on a pin cushion shaped like a couch.

2. Go fishing! If you have a fish tank in the house set up your elf to do a little recreational fishing. This set up requires a straw, some string and a paper clip. Playdoh bucket and tiny toy dog optional.

3. Hide your elf in an empty stocking. This one is pretty straightforward. Save it for a night where you don’t feel like exerting too much energy.

4. Giddy-up! Here our elf is wearing a Woody (Toy Story) hat and riding a toy tractor. We have a lot of farm animal type toys, so this made sense for us!

5. Create a swing for your elf friend! We used some string and a piece of cardboard to create this swing. It’s actually hanging from a ceiling fan, just out of little one’s reach.

6. For this setup we used some regular blocks and some Little People toys to create a “runway” for our Elf’s plane to land on. We included a note that said he flew up to the North Pole the previous night and thanking our son for letting him use the plane. Elf passport optional.

7. This was one of my favorites. I was cracking up the entire time I set it up. Your kids will get a kick out of a zip-lining Elf! Tie a long string from the tree to some other fixture (we used a chandelier in the next room), then hook an ornament along the string and pose your elf! Use a non-breakable ornament for this set-up, in case your Elf decides to take a dive overnight.

8. Playing piano! We had some old Christmas carol piano books and obviously, for this one you need a piano. But if you have another instrument you could use that instead.

9. So this setup is great for very impatient little ones, who just want Christmas to come already! We had our Elf make up a paper chain with a count-down of the days remaining till Christmas, and a note telling our son to cut one off at the end of each day. We hung it on a doorknob for easy access, after our Elf left his spot of course :)

10. Have your Elf be in charge of story time! Set up a few stuffed animals or other toys and face them all towards your elf, in circle-time fashion. Use any book, but I think a holiday book pulls everything together.

11. One night our Elf stayed up to make paper snowflakes. To really make this authentic pose your elf with the scissors and leave the scraps of paper on the floor below.

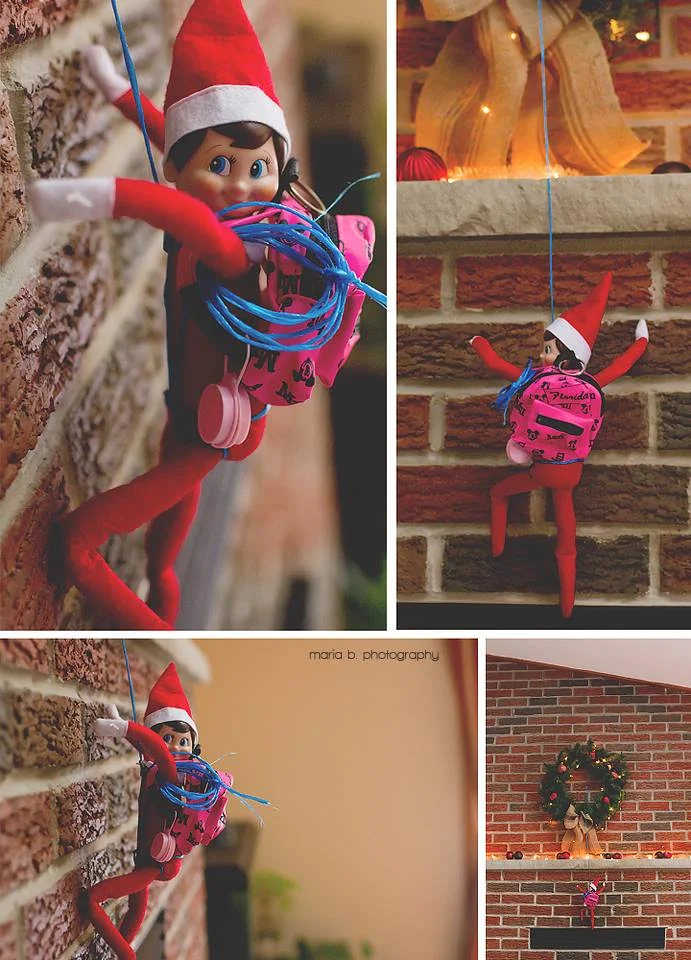
12. Rock climbing Elf on the Shelf – have your Elf scale any surface in your house. You need some rope for him to hang onto, and I twirled a bit around his arm to make it more authentic. We chose to have him climb the fireplace since it’s “bumpy” like a mountain. We also happened to have a mini backpack keychain that we used for the rest of his “supplies”.

13. Last but not least, set up a “snowball” fight! Use mini marshmallows, set up a couple of forts using items from around the house and some of your child’s other toys. Toss some marshmallows around for the full effect!

So that’s that! These are from 2 years ago. I did more last year, and if I ever manage to find the photos I’ll update this post with even more fun ideas! Thanks for humoring me on this non-watercolor or design related post! Hope you enjoyed!
Happy Holidays!
I haven't posted in a while, and thought I'd get back into things by hosting another giveaway for a custom logo design! The time has arrived to announce the winner.
So MANY people entered the contest on Facebook and via Instagram. I loved reading all the comments, and compliments, it really makes me feel great seeing how many people value my work and I feel so honored that so many would want my work to represent their business! I truly wish I could give every one the design of their dreams, but alas - just one for now!
The winner of the logo *this* time is...

Carla Bagley is the winner! Please contact me via Facebook or email to claim your prize! I will be heading over to Instagram now to choose one of the comments as a winner for a pre-made design from my shop, so head over there if you entered!
I will be giving away more logos in the coming year (holla 2016!), so please keep up with everything going on by following me on Facebook or Instagram :) Thanks for participating everyone!
Contact me if you'd like to get the ball rolling on your own custom watercolor logo design!
In honor of the beginning of fall I've got a free print download for you! I hand painted this little illustration this morning when I noticed some of the trees in my backyard are starting to turn colors! I still have to go out and buy some pumpkins to decorate my front steps with, but for now I've got this :)

Feel free to print up as many copies as you like for personal use, the size of the file is 5x7 and 300 DPI and is a flattened JPG. This would make a great card as well! I used heavy white card stock to print on, but any type of paper will do! If you want to preserve the watercolor effect I would use watercolor or texture paper.
Please enjoy and come back soon to see what other freebies and fun items I have here on my blog!
Interested in a custom logo design or something else painted just for you? Contact me!
Wow! What a response! I am floored at how many people commented and entered my logo giveaway! I welcome all my new fans, and of course thank my long-loyal fans for sharing my contest and spreading my work for all to see :)
I have had such a great time reading through all the sweet comments and excited entries. I wish I could give a logo to everyone that wants one, as I think there's nothing more important than a beautiful design that represents you to make your business really SHINE! Alas, I cannot! So without further ado, I present the randomly selected winner of a custom watercolor logo.....
Anna Traintafellou!

Please contact me via FB messages or email to claim your prize!
For everyone else, I am leaving the Instagram contest open until 5pm EST. Comment on my giveaway post there to be entered to win the runner-up prize of your choice of THREE templates from my shop (find me @mariabpaints)
Thanks to everyone who entered. I appreciate every single one of my fans and I can't wait to do another giveaway like this in the future! Stay tuned :)